Copal Shutter
The Copal leaf shutters are Japanese manufactured shutters used on many rangefinder and TLR cameras.
There are several variations of the shutter. The shutter shown here is a simple four speed shutter
with X synch only and no self timer. Speed regulation is by a simple inertia gear set.
Other Copal shutters, such as the widely used MX, obtain a wider range of speeds by using
a typical escapement, but have the same basic design.
The blades on this shutter were clean and there was no need to disassemble the shutter.
The only problems were a sticky cocking lever, hang-up on B, and slow speeds.
Cleaning the speed governor, B lever, latch and cocking lever brought the shutter back
to correct operation. I was able to do all this without removing the shutter from the camera.
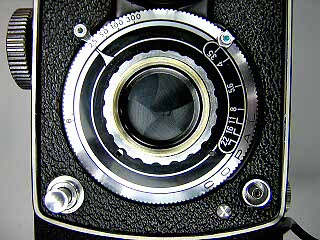 |
Unscrew and remove the front lens assembly. Turn the locking screw one-half turn
then unscrew and remove the scalloped retaining nut around the lens opening.
Lift the faceplate up slightly, slide it out from under the aperture indicator and
lift it off.
|
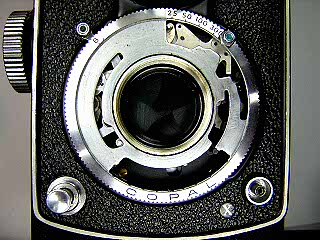 |
Take off the speed setting cam plate. This picture shows the speed cam set for B.
Note the position of the pins for the B lever and speed control in their respective slots.
|
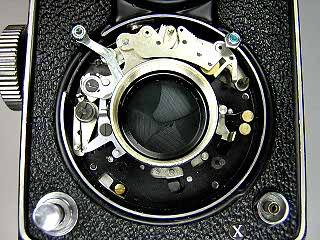 |
This picture shows the shutter mechanism. The speed governor is at the top.
The cocking lever is attached directly to the main spring and cam.
The release, B lever and latch are on the left.
The large gap at the bottom is where a self-timer would normally be located. On versions
with M/X synch, the escapement is located between the release lever and self-timer.
|
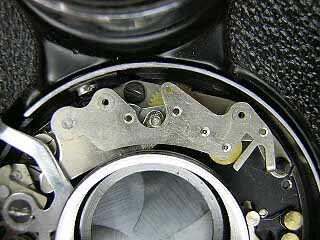 |
Cock the shutter to expose the screw in the base of the speed governor. Remove this screw
and the screw at the opposite end. On some variations of the Copal shutter, you remove the
screw that goes through the top of the cover plate. Lift the mechanism out. Underneath
there will be some shims. On this shutter there is just one large shim. On other versions
there are two triangular shaped shims, one at each end. Lift out the shims so they don't
fall out and get lost.
Note the blade closing spring at the end of the mechanism. If you are going to completely dissasemble
the shutter, remove this spring. If this spring gets displaced, the blades will open
as the shutter is being cocked.
|
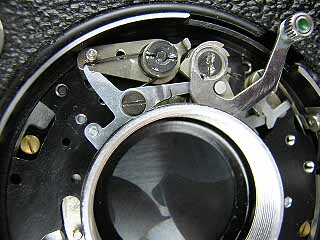 |
Note the position of the spring on the B lever.
This spring is installed underneath the lever. Remove the screw in the B lever then
lift the lever and spring off.
|
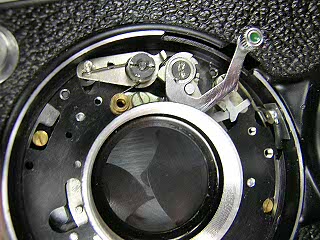 |
Remove the nut on the release and then lift out the spring, lever and bushing.
You need to make a small spanner for this nut by filing away a portion of the
middle of a small screwdriver.
I left the cocking lever in place and just put a little solvent on it to
dissolve the dried lubricants. (Note the damage to the screw head; someone has disassembled
this shutter at some point in the past.)
The flash contact and lever is located underneath the cocking lever. There is a small
brass spring on the flash contact lever that should be removed if you intend to separate
the shutter halves. This spring hooks onto one of the screws that holds the outer
base to the inner base.
|
Notes
Speed adjustment on Copal shutters is normally made by spreading or closing the gap
at the pallet end of the speed governor. Since this model lacks a pallet, I don't see
any way to adjust the speeds. You pretty much get whatever the main spring can deliver.
Lubricate the speed setting cam where it rubs against the case and faceplate. A very
small amount of oil can be placed in the bearings of the speed governor. I usually try
the shutter dry first and only add oil if it won't run properly. Typically, you also see
some lubrication where the main cam strikes the retard mechanism and latch.
|


